So, what have I been up to that I ignored the throngs wanting to read my posts? ;) Well, as you have probably read in Jonathan’s recent posts, we were updating Chuck. First, it was a fridge. But, since Jonathan had to pull out the whole galley to do that, I decided that I had to have pull-out shelving to replace the nasty, cramped shelving under the sink. That led to a full week of designing new shelves.
 I designed them in Google SketchUp like the over-achieving engineer that I am.
With the new TF65 fridge that Jonathan put in, we had a whole 5” of empty space to play with, so I got to design a drawer there as well.
And then since I didn’t have any other original doors on the galley, I thought I might as well update that drawer to the shape that the later vans use. The original drawer ended about 6” deep where the sink drain came down. However, newer vans are a U shape that utilizes the space around the drain. That is what I did. Not only did I design this drawer, but I fabricated it all by myself as well, which is a first. Despite several years of shop in middle and high school and several years of engineering labs, I was never allowed to do something all on my own without someone else taking over to “help” me. So, I am rather proud of myself. Turns out that I am good with cutting wood. Unfortunately, all the things you actually see like the drilling holes for the handle and connecting the face plate to the drawer, I am not very good at.


And, well, since we were adding a fridge that could keep a more consistent temperature and hold more things, I might as well as add an oven too, right? Especially with all this storage space we were adding. I actually was inspired by a blog about living full-time in an RV and there was a section for solar-oven cooking. I was thrilled by the idea. Looking into them though, they took up a decent amount of space that I didn’t really have, and they took a while to cook food, not to mention the fact that they were costly if you didn’t make it yourself. I was getting disappointed and then I came across the Coleman camp oven, a 12”x12”x12” foldable oven that was meant to be used on a Coleman gas stove. I figured that would work well on my gas stove.
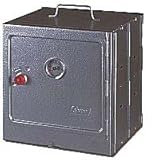
After it was delivered, I was ecstatic. It opened up to a 12” cube and folded down to one square foot about 3” tall, so it would fit perfectly in the new under-fridge drawer. I wanted to test it out the oven capabilities, so I decided to make Alton Brown’s pocket pies as its maiden dish. Upon finishing the prep work, I took a plate out to the van to bake them. I was terribly disappointed to find that the galley lid lip pushed the oven just enough to make it unstable, which just wouldn’t be smart in a 60-sq-ft living space. I was deflated for days.
From there, I went on a roller coaster of emotions between hope and disappointment. Jonathan tried his best to come up with ideas and to comfort me but with no success. Based on his suggestions, I thought maybe we could get a portable camp stove to hook up to the van’s propane supply, but I couldn’t get enough info on the stoves or the only thing they would take is high-pressure propane, and it would be difficult to get that from Chuck. I didn’t want to compromise the safety of the propane system. So, another no-go. Then, I thought we might be able to make our own stove using disposable cake pans clipped together with holes in the top and bottom and a rack in between them. On that test, it slowly started smoking, I looked in the “oven” but didn’t see a cause. I called Jonathan out to investigate. But when he arrived, I checked again and discovered that a large hole had been burned in the bottom pan: smoking cause revealed. Jonathan suggested that as long as we didn’t let the flame touch the pan anymore that it would work, but I didn’t want to risk such a flimsy device. At this point, I decided that I would just have to make the Coleman camp oven work by tying a strap to it and putting a heat-resistant pad between lid and the oven.
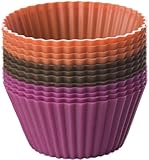
Of course, now with a working oven and fridge, perhaps I should expand my cooking utensils to fully utilize the capabilities? So, per Jonathan’s suggestion, I started looking into silicone bakeware. Unfortunately, no store has them in stock, but Amazon Prime allows me to get them shipped to me in 2 days or less for free or cheap. Seriously, free 2-day shipping and $3.99/item 1-day shipping is really amazing and addicting. I highly recommend Amazon Prime, plus you get access to hundreds of movies and books for free or cheap. So these little guys made it into my possession. What do I like about them? They easily release the food (just like non-stick when you spray them with oil), you can fold or roll them for storage, and they don’t make any noises in our van as we traverse bumpy roads. All these fit in my under-fridge drawer.


People often complain about these changing the cooking times of the item. I wouldn’t really know, as I have started using internal temperature as my guideline for determining if food is done. This little guy is invaluable in that endeavor. For example, I just cooked some cupcakes to internal temperature of 205°F with great success. I was starving for something sweet at my parents’ lake house with nothing to eat. So, I cooked these up using the above-mentioned utensils. Also, since there was not a hand blender at the lake and I didn’t want to pull out the stand mixer, I also tested out this handheld beater, provided by my mother-in-law as belated-Jonathan-birthday-and-Christmas-and-early-Jen-birthday present.
 Adding blueberries made it extremely delicious, and Jonathan gives props for the chocolate chips.
Oooh, I almost forgot! We also updated our kitchen knives. Up until this, we had been using some old steak knives obtained from my grandparents and some cheap ever-sharp knives. They were so bad that I couldn’t get Jonathan to help me with cooking at all. So I thought I would remedy this while in the States this time. While in Branson, I picked up a set of four different Chicago Cutlery knives. Man, let me tell you, if you have never had a really good set of knives, you are missing out. These knives are AMAZING. Cutting through a tomato is like cutting through butter. They are literally sharp enough to take off my fingerprint when running your thumb across the edge. I don’t know about you, but I watch anime and Food Network’s Good Eats (God bless Alton Brown for teaching Jonathan to cook), and I was always jealous of the people who could easily and rapidly chop vegetables in even slices. Let me let you in on a secret: this is possible because they have amazing, sharp knives. So, go out and do it! Buy a nice knife! I highly recommend the Chicago Cutlery Chef knife.
Last addition was a set of nesting pots by GSI. They are durable non-stick and come with lids with built-in strainers. We had been using stainless steel previously. They worked well, I just had issues with storing them. And, little did I know how much time it was taking to clean them until I had to clean the new set. It literally took 5 minutes to clean the stainless steel pots after making a Knorr pasta packet. These new pots take 30 seconds. Love it!


In summation, my new cooking experience in the van is going to be much improved. I am excited to test it out. Now I just need some recipes… So if you know of any good recipes that can be made with ingredients obtainable in Central America, be sure to inform me of them.
No comments:
Post a Comment